GreenGeeks Review 2024
Summary
GreenGeeks is the world’s #1 green energy web hosting provider that offers a vast range of fast and secure hosting services for an affordable price that lets you enjoy a better hosting experience. Free Domain, Free SSL, Free CDN, Built-in Caching, Free Nightly Backup, 99.9% Uptime, and 24/7 Technical Support are some of the key features that make GreenGeeks a perfect fit pick for everyone.
Are you on the hunt for a reliable, fast, and secure web hosting solution? Do you want to know if you can rely on GreenGeeks for creating your next website?
Hands down, you have landed on the right page!
GreenGeeks products are not just affordable but also offer top-notch services quality and amazing customer service, that is the reason over 55,000 customers trust GreenGeeks.
But to help you out in the best way possible, I am here with an unbiased review of GreenGeeks hosting platform included with every aspect (uptime stats, speed performance, support, pricing, and more) you should know about GreenGeeks.
In the end, I will give you our recommendation on whether GreenGeeks is right for you or not. So, do this GreenGeeks review 2024 till the end.
Without further ado, Let’s get started!
Disclaimer: The links mentioned in this post are affiliate links which means I may earn some commission if you buy GreenGeeks services using these links without any extra cost to you.
Table of Contents
GreenGeeks Review 2024 (Summary)
If you are short on time and not able to read the entire post as of now, I will suggest you quickly check out the short summary of GreenGeeks review I have given below to come to a conclusion fast.
GreenGreeks Hosting Review
GreenGeeks is the leading eco-friendly web hosting platform where you find multiple hosting options that fit everyone’s needs and ensure fast page loads, 99.9% uptime, advanced security, exceptional 24/7/365 support, and seamless scalability that results in a pleasurable hosting experience.
On top of that, all their hosting plans are feature-packed, come with a free domain name, free SSL certificate, free CDN, built-in caching, pro-active monitoring & free nightly backups, professional email accounts, and much more. So, no matter what your hosting requirements are, GreenGeeks’ web hosting platform will fit your needs.
GreenGeeks Review 2024 (Detailed Analysis)
Let’s deep dive into the detailed review of GreenGeeks web hosting.
GreenGeeks Hosting at a Glance
GreenGeeks has been around for a little over 10 years, and in that time, it’s established itself as one of the most popular and well-reviewed web hosting companies online.
They set themselves apart from the competition with some innovative green initiatives as well as a focus on customer service.
The company offers a variety of web hosting plans featuring different price tiers so that users can choose what they want at a fair price while being able to rely on quality hosting services.
As a result, to date, they have acquired 55000+ customers, and over 600000 websites are hosted on their platform.
In short, GreenGeeks is a good choice for small businesses and individuals who require an affordable, quality service.
Click here to get started with GreenGeeks
GreenGeeks Speed Test
Your website speed matters a lot. A high-speed loading website not only leads to an impressive user experience but also comes with several other benefits such as;
- Better SEO rankings
- Increased conversion rate
- More time spent by visitors
- Reduced bounce rate
At GreenGeeks, you will experience exhilarating speed because of the fact they use the latest speed technology that includes;
1. SSD Hard Drives
All your website files will be stored on cutting-edge solid state drives which is the fastest hardware.
2. LiteSpeed & MariaDB
LiteSpeed is the renowned web server whereas MariaDB is considered as one of the fastest database servers, both together enhance data read/write, serving pages up to 50 times faster.
3. LSCache
LiteSpeed’s built-in caching technology is here that will let you serve your website pages at lightning-fast speeds.
4. FREE CDN
A free content delivery network is provided with each plan that results in the fastest load times worldwide.
5. HTTP3 / QUIC Enabled
This is the latest network protocol that assures the fastest in-browser load times.
6. PHP 7 Enabled
PHP7 is enabled on all their servers so that you can enjoy the fastest PHP execution times.
All these features will certainly lead to blazing-fast page loads.
To validate the GreenGeeks speed performance, I performed a couple of speed tests on a website hosted on GreenGeeks with the help of website performance testing and monitoring platforms, here are the results;
GTmetrix
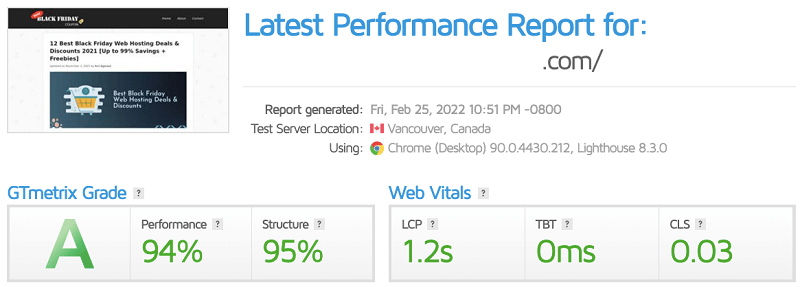
As shown above, the website load time for this website is just 1.2s and the overall grade is A, which is simply superb.
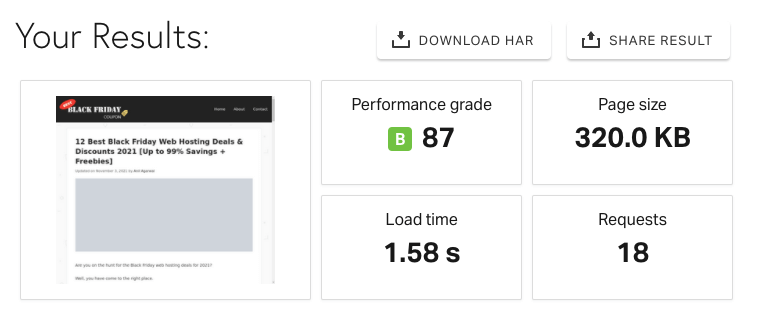
Next, I moved to the Pingdom Website Speed Test tool and again results met my expectations (1.58 sec load time).
But, I went one step ahead and tested the performance on PageSpeed Insights which is from Google itself, here is the report.
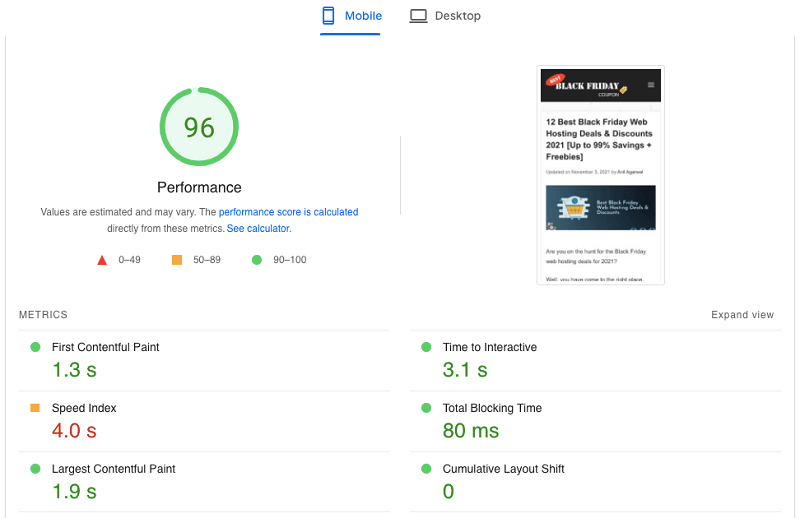
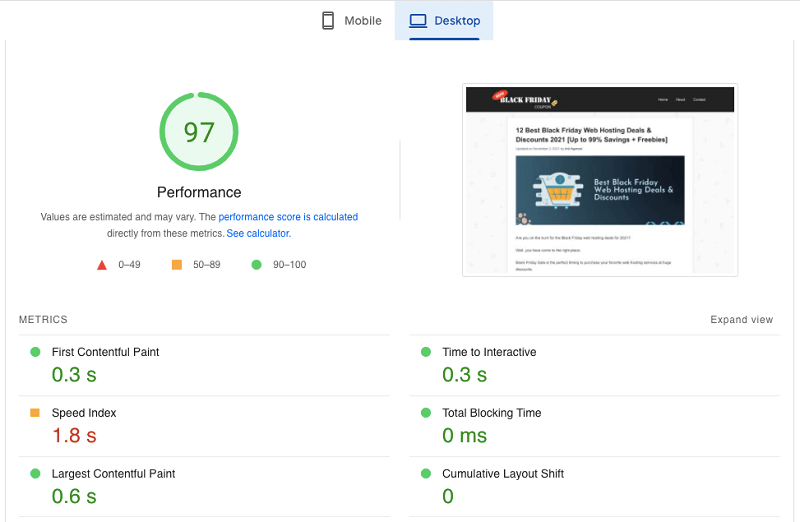
As you can see, data for both metrics (FCP and LCP) is good enough for both Mobile and Desktop devices.
In addition to site speed, you should also consider the server response time of a web host while purchasing any hosting service for you.
It is the amount of time that a web server takes to fulfill a request. The higher is the server response time, the slower your website loading speed will be.
And to measure the GreenGeeks’ Server response time, I navigated to BitCatcha which gives results from various locations, here is the report;
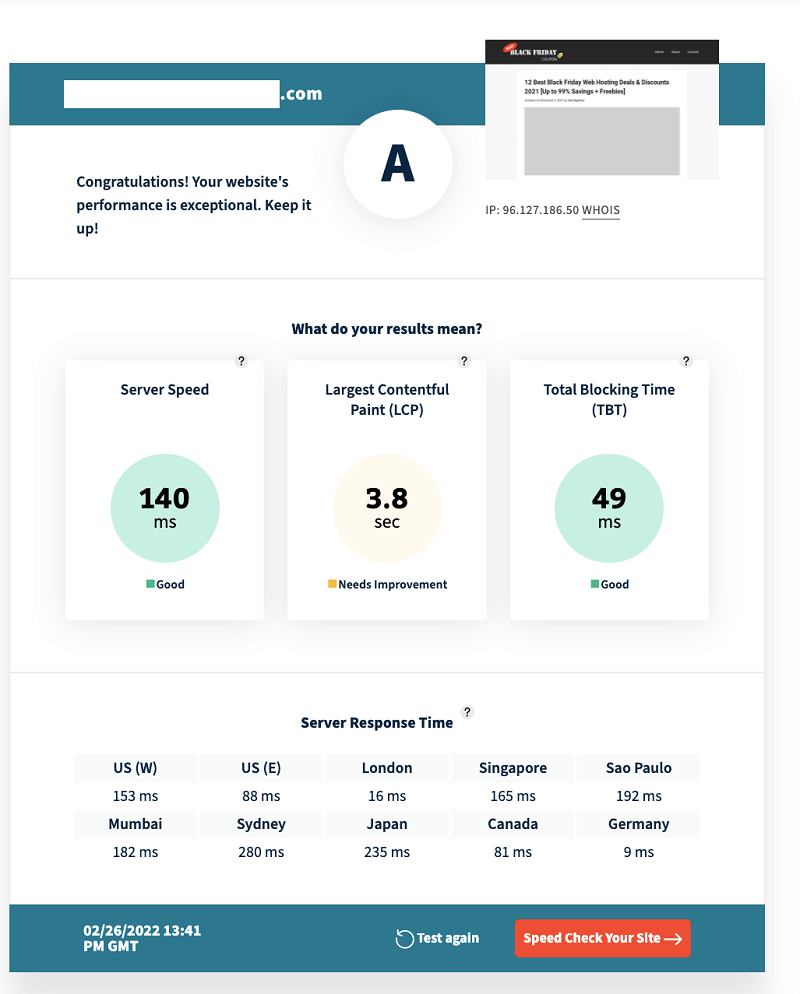
Isn’t it great?
GreenGeeks Data Centers
Whether you know or not, let me tell you the physical location of your server’s data center can affect your website’s speed and latency.
So, to provide the best experience to your site visitors, it’s highly recommended to keep your data center location nearest to your target audience.
But the problem is that majority of reliable web hosts like Bluehost, Hostgator, etc. do not allow you to choose a data center location of your choice.
Luckily, at GreenGeeks you will not face this issue as they have 5 data centers equipped with the most powerful infrastructure that ensures the fastest connectivity and unmatched availability to your users.
These are the data center locations available at GreenGeeks that you can choose based on your target audience.
- Phoenix
- Chicago
- Toronto
- Montreal, and
- Amsterdam
So, if you want blazingly fast speed for your website, go with GreenGeeks without thinking twice.
GreenGeeks Uptime History
Uptime is another important metric when it comes to choosing a web host that indicates the amount of time the web host server (and your website) is available and operational.
Website outage leads to revenue loss and several other problems which can really hurt you in the long term.
So, it’s better to check the uptime of the web host you’re planning to go with.
Generally, it is stated as the 99.9% uptime guarantee and the same goes with GreenGeeks.
They have implemented pro-active real-time monitoring on all of the critical services that help them to identify serious issues before they occur, helping them to maintain 99.9% uptime on their web hosting platform.
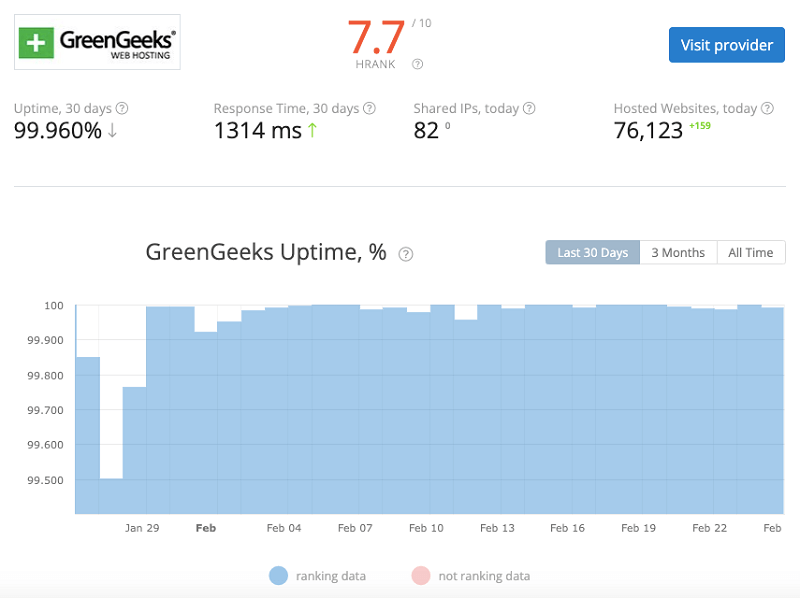
To verify the same, I took the advantage of HRANK which is the most reliable platform to track the Uptime, Response Time, and other features of shared hosting providers.
Interestingly for the last 30 days, I found 99.96% uptime which is quite satisfactory.
Moreover, I have been also tracking GreenGeeks’ real-time uptime for more than a year now with the help of UptimeRobot.com which is a reliable uptime monitoring service, and fortunately, no downtime recorded so far.
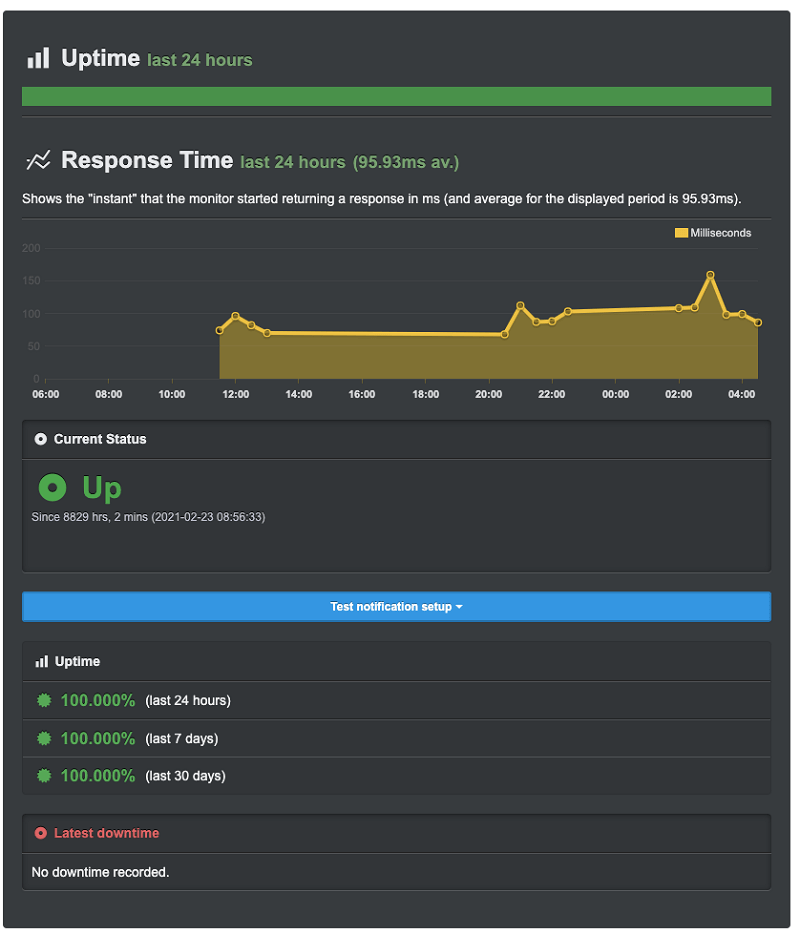
See that?
GreenGeeks Security Features
In addition to the high-speed website performance and 99.9% uptime, they also got you covered with resilient security to keep your websites secure from any kind of vulnerability.
Let’s see what are the security features you will be getting with GreenGeeks hosting services.
1. Free SSL Certificate
SSL certificate is an out-an-out necessity nowadays and comes with several benefits such as data protection, better search engine rankings, easy online payments, improves customer trust, and so on.
At GreenGeeks, as soon as your website goes live, they deploy the Let’s Encrypt SSL Certificate for free which is also auto-renewed without any cost.
2. Advanced WAF/AI
GreenGeeks uses advanced firewall protection that detects and protects your site against almost every type of attack.
3. Free Malware Cleanups
Website hacking is an issue facing almost everybody in the modern world, right? But at GreenGeeks, you don’t need to worry about it as they clean up your website’s infection without charging anything from you.
4. Daily Backups
Most importantly, nightly backups are included for free which you will find rarely with any other web hosting provider at this pricing.
This means they take backup of all your website files every single night that will keep your website safe from any crisis.
GreenGeeks Technical Support
Customer service plays a crucial role in uplifting any brand’s reputation.
Fortunately, GreenGeeks’ customer service is outstanding and responsive, and one of the aspects that make GreenGeeks way ahead of its competitors.
You can contact them anytime you need them via;
1. Live chat
This is the most recommended way to get assistance at GreenGeeks as their live chat is available 24/7/365. The best thing is that there’s no waiting time and all your questions will be answered immediately.
I experienced their chat support many times and every time they supported me very well. So, I am quite sure that you will also be impressed with their chat support system like me.

2. Email
Next, you can take the help of evergreen email communication where they claim a waiting period of approx. 15-20 minutes.
The one thing that I really liked about their email support is that they have separate email addresses for each department.
Let’s say, for sales-related inquiries, you can email them at sales@greengeeks.com, to ask any technical questions, you can connect with them at billing@greengeeks.com, any help regarding their affiliate program, you can shoot them an email at affiliates@greengeeks.com, and so on.
3. Phone
If you’re the one who better likes to communicate over the phone, then also GreenGeeks is the right choice.
You can call and speak to one of their hosting specialists Mon-Sun: 9 AM to 12 AM EST at the following lines;
- 1-877-326-7483
- 1-310-496-8946
The last but not least, they have a massive knowledge base which is categorized very well where you can search easily for any topic you need help with.
All in all, GreenGeeks support is fruitful and you can expect all your queries sorted in a timely manner!
GreenGeeks Ease of Use
GreenGeeks is a feature-rich web hosting and also facilitates easy management with intuitive tools.
Their dashboard is quite easy to use and gives you convenient access to all the important tools you need to manage your website(s) without any hassles.
This is how it looks;
Whether you want to install WordPress, Joomla, Magento, or any other application, their time-saving one-click tool — 1-Click Installer will help you do so with a simple click.
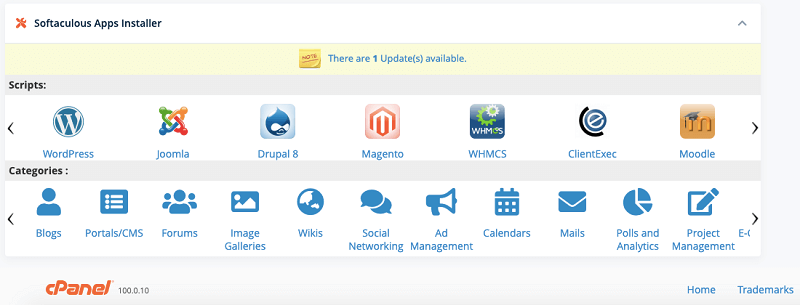
Above all, you will be privileged with the industry-leading control panel cPanel that offers graphical interface and automation tools to simplify the overall process of hosting a website.
On the whole, GreenGeeks will make your hosting experience wonderful.
What Makes GreenGeeks Hosting Platform Unique?
Well, there are several reasons to choose GreenGeeks over other hosting providers, let me show you the top benefits of using GreenGeeks web hosting services.
1. 300% Green Energy Match

First thing first — GreenGeeks hosting platform is backed by eco-friendly data centers and servers, generates 3 times the power they consume into the grid in the form of renewable energy credits. So, if you become a part of GreenGeeks, you will be contributing to the environment and can feel good about it.
2. Exhilarating Speed
GreenGeeks has opted for SSD storage and implemented the best speed technologies (LiteSpeed Web Server, CloudFlare CDN, and more) that result in blazing-fast website performance.
3. Enhanced Security & Reliability
Free SSL Certificate, Daily Backups, Advanced WAF/AI, Free Malware Cleanups are there that ensure top-notch security so that you can sleep easy.
4. Multiple Data Centers
High performance is the need of the hour and GreenGeeks understands it better. That’s why they have a well-planned infrastructure comprised of 5 data centers and you’re allowed to choose one when creating a hosting account for you.
Some more reasons to choose GreenGeeks:
5. Free Domain Name & Transfer
At GreenGeeks, you can register a fresh domain name (including .com) for free for 1st year which is a plus point for beginners and aspiring bloggers.
Furthermore, you can also use a domain name that you’ve already registered.
6. FREE Website Migration
GreenGeeks not only provide you with a free domain transfer but also website migration. So, if you want to switch to GreenGeeks their professional website migration specialists will move your website for you, without any additional charge.
7. Free Drag & Drop Builder
Along with 1-click WordPress installation, with GreenGeeks, you will also get free access to a drag and drop site builder that will help you create your website without any technical skills.
8. Powerful Email Hosting Included
With GreenGeeks hosting plans, you can create unlimited custom email accounts for free that also comes with advanced capabilities such as IMAP/POP3, Spam Filtering, Webmail Access, and Calendar & Contact Sharing.
9. Expert 24/7 Support
At GreenGeeks, you have the back of a professional team of experts having years of experience to assist you by chat, ticket, or phone.
10. 30 Days Money-back Guarantee
Last but not least, they’ve got you covered with a completely risk-free 30-day money-back guarantee.
GreenGeeks Hosting Pricing Plans
Whether you want to start a WordPress blog, build an eCommerce store, or looking for a screaming fast hosting solution, resell web hosting to your clients, GreenGeeks is an ideal choice for all your needs.
First, let’s get into the details of their shared hosting plans.
GreenGeeks WordPress Hosting
This is the simplest and most economical way to go online. Here are the complete pricing & plans details;
1
Lite
$2.95/mo
One Website
Standard Performance
50GB Web Space
Unmetered Transfer
50 E-mail Accounts
Free WordPress Install
Free WordPress Migration
Auto WordPress Updates
Free SSL Certificate
Free Domain Name for 1st Year
Free Backup
Free CDN
WP-CLI & SSH Access
Built-in Caching
Unlimited Databases
300% Green Energy Match
1 Tree Planted
30-Day Money-Back Guarantee
Multi-user Access
2
Pro
$5.95/mo
Unlimited Websites
Better Performance
Unlimited Web Space
Unmetered Transfer
Unlimited E-mail Accounts
Free WordPress Install
Free WordPress Migration
Auto WordPress Updates
Free SSL Certificate
Free Domain Name for 1st Year
Free Backup
Free CDN
WP-CLI & SSH Access
Built-in Caching
Unlimited Databases
300% Green Energy Match
1 Tree Planted
30-Day Money-Back Guarantee
+
Multi-user Access
On-demand Backups
WordPress Repair Tool
3
Premium
$10.95/mo
Unlimited Websites
Best Performance
Unlimited Web Space
Unmetered Transfer
Unlimited E-mail Accounts
Free WordPress Install
Free WordPress Migration
Auto WordPress Updates
Free SSL Certificate
Free Domain Name for 1st Year
Free Backup
Free CDN
WP-CLI & SSH Access
Built-in Caching
Unlimited Databases
300% Green Energy Match
1 Tree Planted
30-Day Money-Back Guarantee
+
Multi-user Access
On-demand Backups
WordPress Repair Tool
Free Dedicated IP ($48/yr value)
Free AlphaSSL ($99/yr value)
Object Caching (Memcached & Redis)
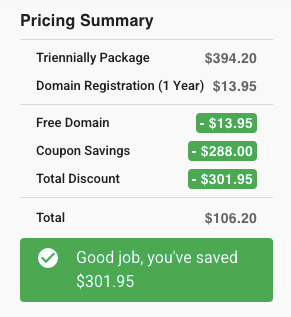
Note: All the pricing mentioned above is valid on only 36 months billing cycle. Alternatively, you may also opt for biennially, annually, or monthly billing terms but in any case, you will end up paying more. So, I would recommend you to go with the triennial plan to save huge on your order.
GreenGeeks Reseller Hosting
A reseller plan is a great way to start your own hosting business and earn recurring revenue. Here are the complete details of Greengeeks Reseller Hosting Plans with cPanel/WHM.
1
RH-25
$19.95/mo
60 GB SSD Disk Space
600 GB Transfer
25 cPanel Accounts
Free SSL Certificate
Free cPanel Migrations
GreenGeeks Managed Support
30-day Money Back Guarantee
300% Green Energy Match
1 Tree Planted
2
RH-50
$24.95/mo
80 GB SSD Disk Space
800 GB Transfer
50 cPanel Accounts
Free SSL Certificate
Free cPanel Migrations
GreenGeeks Managed Support
30-day Money Back Guarantee
300% Green Energy Match
1 Tree Planted
3
RH-80
$34.95/mo
160 GB SSD Disk Space
1600 GB Transfer
80 cPanel Accounts
Free SSL Certificate
Free cPanel Migrations
GreenGeeks Managed Support
30-day Money Back Guarantee
300% Green Energy Match
1 Tree Planted
GreenGeeks VPS Hosting
Do you need more computing resources than traditional web hosting but at the same time keep costs in check, GreenGeeks managed VPS hosting plans are right for you. Here are the complete details;
1
2GB
$39.95/mo
2 GB Ram
4 vCPU
50 GB SSD Disk Space
10 TB Transfer
cPanel Included
Free SSL Certificate
Free Website Transfer
Free Softaculous License
GreenGeeks Managed Support
300% Green Energy Match
1 Tree Planted
30-day Money Back Guarantee
Available in USA, Canada & Europe
2
4GB
$59.95/mo
4 GB Ram
4 vCPU
75 GB SSD Disk Space
10 TB Transfer
cPanel Included
Free SSL Certificate
Free Website Transfer
Free Softaculous License
GreenGeeks Managed Support
300% Green Energy Match
1 Tree Planted
30-day Money Back Guarantee
Available in USA, Canada & Europe
3
8GB
$109.95/mo
8 GB Ram
6 vCPU
150 GB SSD Disk Space
10 TB Transfer
cPanel Included
Free SSL Certificate
Free Website Transfer
Free Softaculous License
GreenGeeks Managed Support
300% Green Energy Match
1 Tree Planted
30-day Money Back Guarantee
Available in USA, Canada & Europe
So, are you ready to get started with GreenGeeks’ eco-friendly reliable web hosting platform?
How to Setup a WordPress Website on GreenGeeks?
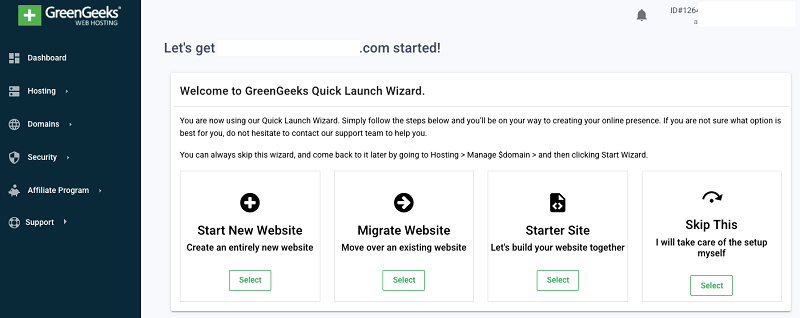
If you’re looking forward to building a new website then GreenGeeks Quick Launch Wizard will let your WordPress site up and running in mere moments.
Here is how does it work…
Step 1: Visit this link to go on the GreenGeeks’ official website.

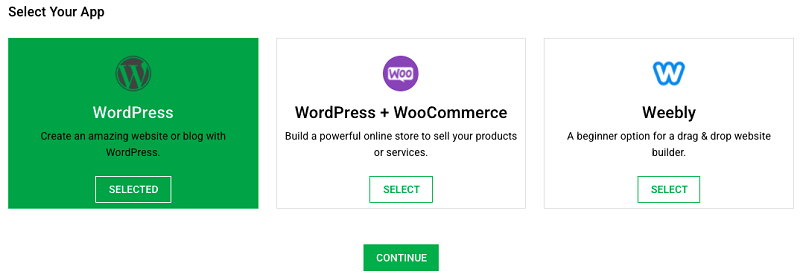
Step 2: Hit the “Get Started Now” button and select a suitable plan, let’s say — Lite.

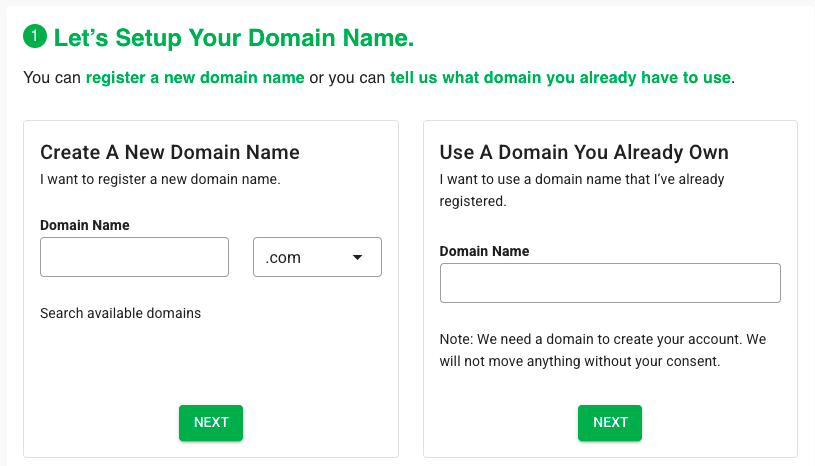
Step 3: Setup your domain name (either you can register a new domain that is absolutely free or use an existing one if you have any).
Step 4: Enter account information, package information, payment information, and checkout.
Step 5: Login into your hosting account, start Quick Launch Wizard, install WordPress, and your site will be live within a few moments.
GreenGeeks Pros
Here are the positive aspects of using GreenGeeks hosting.
- 300% Match with Renewable Energy
- Host Unlimited Domains
- Free Domain Name for 1st Year
- SSD Web Space
- Unmetered Data Transfer
- Personalized Free E-mail Accounts
- Unlimited MySQL Databases
- Unlimited Sub & Parked Domains
- Free Drag & Drop Builder
- Free Website Transfer
- cPanel & Softaculous
- 30-day Money Back Guarantee
- Multiple Data Centers
- Optimized LiteSpeed and MariaDB New
- Free CDN Integration
- HTTP/3 & PHP 8
- LSCache Support
- Free Let’s Encrypt Wildcard SSL
- Nightly Data Backup
- Free DDoS Protection
- Multiple PHP Versions
- Free SSH and Secure FTP Access
- 24/7 Technical Support
GreenGeeks Cons
Here are the downsides of using GreenGeeks hosting.
- The staging feature is missing which is quite helpful to test any changes safely
- Renewal prices are higher (same goes with other web hosting companies)
FAQs
Here are some of the most commonly asked questions about the GreenGeeks web hosting.
GreenGeeks is the leading eco-friendly web hosting provider that offers a variety of hosting solutions including WordPress, WooCommerce, Reseller, and VPS while helping the environment.
GreenGeeks was launched back in 2008 but its management team has over 40 years of experience in providing high-quality, affordable website hosting.
GreenGeeks hosting platform is engineered to deliver you the best speed, security, easiest scalability, and exceptional support. All of this is available at an affordable price while making a positive impact on the environment, making this green host is worth checking out.
GreenGeeks plans are fairly priced starting at Lite ($2.95/mo), Pro ($5.95), and Premium ($10.95/mo).
Currently, GreenGeeks is giving up to 73% discounts on all its web hosting plans, no coupon code is needed.
Indeed, GreenGeeks uses the latest speed technology comprising SSD hard drives, Litespeed & MariaDB, LSCache, free CDN, HTTP3 / QUIC enabled, PHP 7, and multiple data centers that lead to blazing-fast page loads.
You are allowed to choose from five data centers located in Chicago, Phoenix, Toronto, Montreal, and Amsterdam.
All GreenGeeks plans come with complimentary nightly backups to protect your data from any hardware failures and accidental erasure.
Yes, with GreenGeeks you can create custom email addresses such as name@yourdomain.com for free.
You can check your emails via Webmail client using any of these URLs: http://webmail.ggexample.com/ or http://ggexample.com/webmail/ All you need to replace “ggexample.com” with your domain name.
If you want to cancel your GreenGeeks account or stop auto-renewal, you need to submit a cancellation request 7 business days before the account renewal date. As a confirmation, you will receive an email receipt of your request.
At GreenGeeks, you’re covered with a 30-day money-back guarantee.
You can easily contact their support team via live chat, email, and phone.
Also Read:
- Hostinger Review 2024 – Is It The Right Web Host For You
- Bluehost Review 2024 [+ My 12 Months Initial & Renewal Exp.]
- WPX Hosting Review 2024 – Is It the Fastest Managed WordPress Hosting?
- HostArmada Review 2024: What Makes This Hosting Awesome?
- ChemiCloud Review 2024: What Makes This Web Host Exceptionally Incredible?
Final Thoughts on GreenGeeks Review 2024
So here, we have come to the end of this GreenGeeks review for 2024.
Based on my experience and research, GreenGeeks is a great web hosting provider that offers competitive pricing and full-featured Web hosting services with WordPress compatibility. With 24/7 customer support and over ten years of experience, GreenGeeks is my top pick for the best value in web hosting.
So, if you’re looking for a cost-effective, environmentally friendly way to host your website, GreenGeeks is the perfect match.
Nonetheless, their 30-day money-back guarantee gives you plenty of time to experience the hosting yourself. Try them out and see for yourself why they are so highly rated!
What do you think about this GreenGeeks review? Got any questions? Let me know in the comment section below.
Hi Amit,
A few bloggers recommended GreenGeeks to me when I looked for the best alternative to SiteGround after their price hike. And reading the review here and seeing first-hand GreenGeeks’ speed performance on desktop and mobile, respectively, and other essential reports make the web hosting provider a top contender.
Thanks for sharing!😊
Hi Moss
I agree with you. GreenGeeks came out as one of the best SiteGorund alternatives when SiteGround increased its pricing in the past.
To double-check if GreenGeeks can be trusted, I did a comprehensive review on GreenGeeks and found satisfactory results, which I thought is worth sharing with my audience through this post.
Thanks
Amit Garg
GreenGeeks is best webhosting service. I can easily upload, edit, and view web site pages via cPanel. Whenever I get stuck, I contact GreenGeeks support team and a technician talks me through a solution. No waiting on a long call wait line.
I highly recommend GreenGeeks!!!
Thanks
Aadiv
Wonderful Guide on Greengeeks review bro!
Greengeeks will be a best alternative for siteground. Even I too looked to purchase siteground at first.
But unfortunately their services is not available in India. So, I purchased Greengeeks before a year.
Till now I have never faced any issues with the Loading speed and uptime performances.
Their customer support is also quick and responsive like WPX.
Hi Ganapathi
Thanks for sharing your views on GreenGeeks hosting.
I am glad that you’re also satisfied with the GreenGeeks hosting services.
Amit Garg
Another day another awesome post from Amit Bhai.
You are such a beast when it comes to blogging who wants to cover each and every topic regarding blogging.
By reading this awesome review I can feel how much time you have invested into this blog post.
Thanks for providing such an awesome review.
Cheers,
Nishant
Greengeeks definitely one of the best hosting right now. Plan to move my blog in Greengeeks
Thanks Amit brother for reviewing greengeeks
Hi Mahmudul
Yes, GreenGeeks is definitely a great option for beginners looking forward to starting a blog.
They also offer free migration, so you can easily switch to GreenGeeks without any hassles.
Thanks
Amit garg